Bill And Val's Allison Dune Buggy
Project Blue Moon Dune - Building a Bad Ass Family Fun Car
The arrival of our new family member in October 2005 means less of one of our most favorite activities: riding a motorcycle. To fill the void left by this awesome activity, we have elected to start an open car project!
Project Goals are:
1. Be steet legal : SUCCESS!
2. 0-60MPH in under 6.0 seconds : SUCCESS! (5.1 seconds, +/- .2)
3. Be unique enough in appearance to cause people to notice : SUCCESS!
4. Be reliable for taking 500 mile range trips : Unknown
5. Have room for four or more passengers : SUCCESS!
6. Open ride for all passengers : SUCCESS!
7. Run comfortably at 70MPH : SUCCESS!
8. Cost less than $10,000 : Fail. :(
9. Learn a lot : SUCCESS!
Track the on-going Blue Moon Dune buggy project as Bill and Val create this true family fun car. You'll find information on chassis, power plant, suspension, transmission, and interior selection as well as reports from the road as the car propels this family to new places.
All information is posted in reverse chronological order. That is, the most recent information is posted at the top.
You are welcome to reuse the information found here for any purpose as long as you provide a link back to this site on the same page where you present the information.
Blue Moon Dune
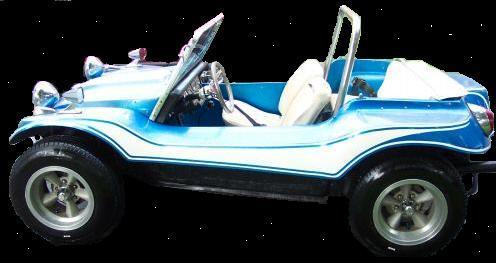
Blue Moon Dune Buggy has been SOLD!
(05MAY09)Sad day for sure. Today, Blue Moon Dune was transferred to a new owner. This is in preparation for the
Mother of All Trips that we are taking. The car had accumulated 600 miles while we owned it. Bill sold it for 40% of what we put into it (not including labor, which was pure fun for us). Val took a video of Bill's last drive of Blue Moon Dune with KJ as navigator. Here is the link:
Bill's Final Drive in Blue Moon Dune.
First 200 miles in the Blue Moon Dune Buggy
(02MAR06)This car is great! We've now driven it a few hundred miles and with each mile, the smile gets bigger. And talk about attention, we get thumbs up all over the place. The car is like a magnet. When we stop for gas, or a VW rally, people stop and want to check out the car. As far as acceleration, this car can certainly hold its own. Without admitting anything "illegal", Blue Moon Dune easily runs with the big dogs (e.g. Porsches, Corvettes ... with three differnt Porsche drivers giving me big thumbs up signs!)! It especially likes eating rice. ;) Not that we've ever done this, but Blue Moon Dune can punch from 70 to 90 quite nicely. Next stop, the Silver Dollar Showdown! (not to race, just to hang out with other extreme VWs). On another note, gas mileage sucks! I really need to get a gas gauge.
Drivin' Blue Moon Dune Buggy
(16JAN06)It's alive!!! Blue Moon Dune was happily rolling down the roads last weekend and even one day during the week! She rides great! Plenty of power, and she sounds magnificent! No issues with any hill ... and when floored, the head rears back and she accelerates at an amazing pace!! I believe a few cars were a bit surprised until I flew past them and they saw the engine. :) To say we are excited would be an understatement. The car is amazing! There are still a few lights to hook up and such, but for all practical purposes, she is rolling! The interior will definitely need some treatment ... that will be coming over the next year or so. The budget for the car is expended at this point, so the dune buggy will just have to receive updates over time.
At 70 MPH, the dune buggy is at around 4000 RPM with another 1500 or so RPM in the power band. Some vibration is there at 70 MPH, but it isn't too bad. I will be taking the car in for an alignment to see if that helps. The 4.12 R&P ratio was definitely the way to go. From a loud perspective, when you step on the gas and the RPM goes into the 3500 RPM rage, this sucker is very loud! I watched as a number of people turned around to see what was coming. I also decided that the wimpy horn has got to go ... I need a Semi or Train horn.
Wahoooo! See you on the road!
Dune Buggy Wiring
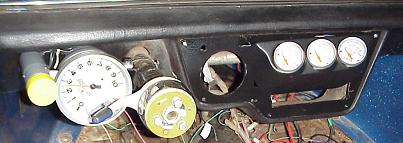
(05JAN06)Wiring is progressing forward, one wire at a time. Bill has the tachometer, external shift light, oil pressure, cylinder head temperature, and voltmeter gauges hooked up. All of the gauges are from AutoMeter. When revving the motor, it is so cool to watch the external shift light come on! Bill was shocked at the amount of power delivered at the lower RPM ranges. Nothing like a nice stroker engine! The switch panel is a Moroso 5 switch affair with an LED on indicator for each switch, plus a starter button. We have not yet identified the best location for the switch panel, but it sure looks good. One switch controls fire to the engine, the next controls all the gauges, the third is for the lights, the fourth is for the wipers, and that leaves switch five for something down the road.
2027cc Dual 2 Barrell Carb Scat Turn Key VW Engine Is IN!
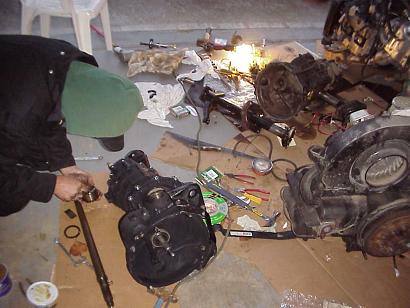
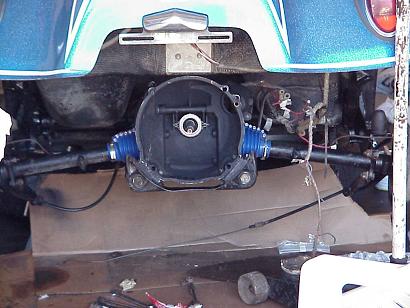
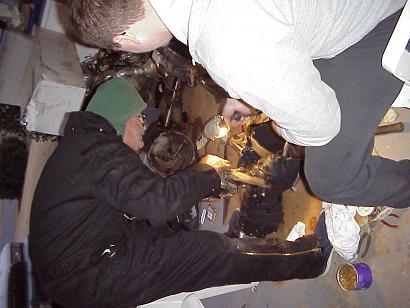
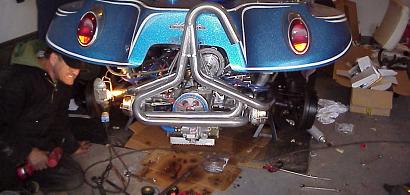
(28DEC05)20 hours of labor, 48 hours of life (1 PM, Dec 26 - 1:30PM, Dec 28), one pro street Rancho transaxle (4.12 RP), one Scat turn key 2027cc with dual two barrel carbs,
and one amazing father-in-law = ONE AWESOME DUNE BUGGY! Blue Moon Dune now has a new transaxle and engine! :) The
amount of work we put in (with the dad in law doing the vast majority) was incredible. The end seemed like a blur,
but once the engine fired up and roared like a dragster, we were both instantly energized!!! :) It is
hard to describe how awesome the engine sounds. During the build, at every turn,
there was something my dad in law didn't like (nothing like having a mechanic with 40 years of experience as
a family member), so we repacked the rear bearings, put in new seals, and fixed a ton of other little things along
the way (many trips to the local auto parts store). True mechanic know how was evident ... like watching a master of any discipline. We would hit a point
and I would be puzzled, yet he would look at it and know instantly what to do. Based on what I've learned, if your
mechanic skills are on the same level as mine, I highly recommend you get a dad-in-law that has spent his whole life
professionally working on cars, trucks, bobcats, etc. :) Thank you Charles!!! :) I believe he understood how
excited I was when I yelled, "Holy SHIT!" when she first started up! Neither of us could contain the grins. Super
Dad-In-Law is now back on his way home (about 6 hours from here) and I need to go back in and put the shocks and tires back
on, finish up the wiring, put the new carpet down, mount the license plate bracket in a new location, and
re-install the seats and we will be ready to roll! I think I'll take a day or two off before doing this. The
garage is in some serious need of attention (e.g. it needs a clean up so Val can put her car in!).
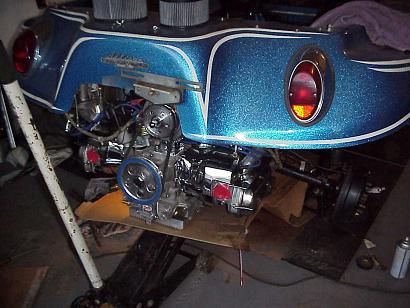
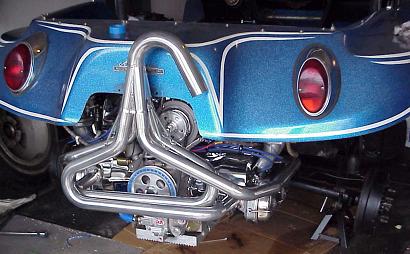
It's here and it's 150+ HP!
(11NOV05)YEAH! The delivery truck dropped off our Scat Turn Key, 2027cc 150 HP engine! The additional HP was achieved with the addition of Scat's Racing 1-5/8" Baja Merge Exhaust system which added between 10% and 15% to the engines rating! With the 140 HP engine, the additional 10-15% implies a rating of 154 - 161 HP!!
After gawking at the engine for about an hour, we took some pictures and packed it back up. You will notice from the photos that the engine is actually inside a steel cage and bolted to a wood floor. We've elected to leave it in the cage until we install it.
Dealing with Scat on this engine was pleasurable. Their sales engineer helped Bill select the right parts, and their build engineer helped ensure what was selected was right. The only hiccup was the actual delivery. Scat failed to notify us when it was coming, so the call from the driver was a surprise.
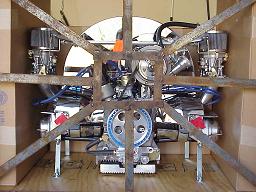
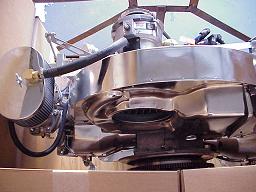
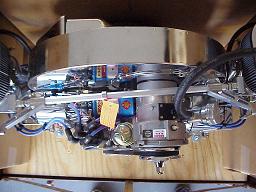
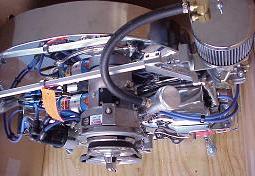
140 HP!
Lots of cleaning and glossy black painting going on while we await the Scat built engine. Since the last update, more communications have gone on with the Scat engine builders and we are now looking at a 140 hp engine. This was accomplished by upgrading the heads to the Scat Mini Ds and going with dual two barrel 44 EMPI carbs. The internals themselves are not changed, so other than a reduction in gas mileage and the increased horsepower, we dont expect too much of a loss in reliability! For the record, Scat has been outstanding so far
with their engine builder even calling me during the assembly to confirm various engine aspects.
Going Air Cooled!
Yet another course change on the Blue Moon Dune project! After chatting
with the family mechanic (Val's dad) about the project for 45 minutes,
we've decided to punt on the EJ20 and go with a nicely built air cooled
VW engine! As such, Bill has been working with Ron G at
Scat to build a reliable 115 HP engine.
Ron's proposed engine is a 2027cc stroker! It will be great from
a low end torque perspective. The engine will also have a ring and pinion
ratio of 4.12. That will help make the cruising aspect of Blue Moon Dune
nice. We are targeting receipt of the engine in mid-December (Scat can turn
it around faster, but we just won't have time to put it in). So, what
do we do with that beautiful EJ20 in the garage? Don't know yet!
Transaxle Freed
Today (25SEP05) the transaxle was released from its harness! Two tools had to be bought to complete this: a 27mm socket for the rear transaxle mount and a channel lock wrench (for that stripped brake line). Once everything was undone (bolts, lines, wires, etc.), we placed a floor jack under the transaxle and began wiggling it back and forth as well as up and down. Bill went and grabbed each swing arm and pulled back. At first it wasn't moving, then slowly it moved. We repositioned the floor jack further up (about 4 inches from the front end of the transaxle) and viola! That change in position did it. When Bill pulled back the transaxle came free. Now it is time to get on the phone with the folks at Rancho Performance and order a Rancho Performance Transaxle!
We had two interesting finds today. The driver side shock lower bolt was not the original one. Someone had put in one that was really long and it required a spacer. The spacer they used was actually a socket! The other find was that the nut on the driver side front transaxle mount was stripped. Yes, the nut was stripped. As Bill turned it, it just kept spinning. After applying some odd leverage, Bill was able to back it out only to see that it was completely smooth inside. The bolt, however, looked great .... all the threads still there.
Transaxle Removal Continues
Still working on the transaxle removal. There are a number of nuts and bolts that have chosen to make this a difficult task. Once again we're thankful that we're doing this on a dune buggy as access to various locations is unobstructed. One brake line is removed, the other doesn't want to unbolt (now it has become stripped). Two of the big nuts holding the axle housing to the passenger spring plate are removed, the last one is tough to get a socket on. To get the type of access we need, we decided to work on removing the shock absorber, but that bottom nut has decided to make it difficult for us. We also learned a lesson this weekend (Sept 18th, 2005), never put your favorite coffee cup on top of the car that you are working on. Some bump, vibration, or magic force of the universe will knock it off and it will break. Time to get a new favorite coffee mug!
Wheel Work
This weekend (14AUG05), I wanted to see in what shape the wheels (hub, bearings, breaks, wheel cylinder, etc.) were in. After taking apart the front wheels, I was pleasantly shocked to find that the previous owner had already replaced all the key components of the front end! Bonus! During the removal of the drums I discovered that wheel adapters had been installed. :) Another nice bonus! So now I can fit any standard five lug wheel to Blue Moon Dune, although I like the ones already on the car. The drums looked like crap, so I took all four of them and cleaned 'em up. Lots of oils, grease, and rust. After a complete cleaning, I applied a shiny black brake drum paint and the difference is amazing. Having all these items off and cleaned, we elected to re-pack the wheel bearings.
Tear Down Begins - Remove the Insides

On Saturday August 6, 2005, project Blue Moon Dune entered the tear down phase. No more fun rides through the neighborhood, nor revving the motor in the garage to hear the cool sound. It is time to get this project going!
First, we disconnected the battery and we then attacked the dash. When first removed, the back of the gauge panel looked like a rats nest of wires. However, by taking each wire off each gauge one by one, and by taking our time, the jumble started to make sense. Each wire was labeled with where it came from, where it went to, and what its function was. All the gauges were placed in an old coffee can just in case they are needed for future reference. Once the new gauges are installed, the old ones will be sold on eBay.
With the dash taken apart, the next thing to be removed was the steering wheel. Multiple web sites "explained" how to do this: simply remove the nut. But where is the nut? After taking a flat head screw driver to the rust encrusted non-stock steering wheel cap, the magic nut was found and removed. And just like that, the steering wheel was taken care of! Since we want to replace this steering wheel with another more sporty one, we will be hunting some junk yards for a VW Jetta steering wheel. According to a few different web sites, the conversion is easy plus you get the nifty VW logo embedded in the center too. The one part of this we don't know how to handle yet is the turn signal lever. It is the stock, off white plastic one and doesn't fit the demeanor of Blue Moon Dune.
On to the seats. Taking them out turned out to be the hardest part of the work this weekend. A number of web sites stated that for a 1965 VW, it is simply a matter of sliding them forward and out of their tracks. Alas, after years of sitting in a stationary position, they didn't want to slide! We are not sure that they ever did. After a number of whacks with a hammer, the seats broke free and came out. Now, do we cover them, re-do them, or put new ones in?
The carpet removal was a breeze. We kept it in tact so that we could use it as a pattern for the new marine grade carpet that we are putting in. With the carpet out, we vacuumed the car yet again.
With our first unobstructed view of the pan, we began the rust analysis. As is common with old VWs, there is rust and we determined that ours isn't too bad. We will be using sand paper, tin snips, and some chemicals to control the rust. Once the rust is taken care of, a steel epoxy compound will be used to fill the holes.
When you take apart something that has been around for a long time, you never know what you will find. We hoped for a million dollars, but what we actually found was a mouse nest in the pan channel! Fortunately, no one was home (probably darted out the first time it was fired up after they made their home) but there sure was a lot of nest material to get out.
Weak Links
The stock VW Transaxle (a transmission plus differential) obviously wasn't designed to take this increased horsepower. So it will have to be replaced. We've identified a number of options to handle the higher torque, these include swapping out for a Porsche 5 speed or potentially 6 speed (901, 915, G50, etc.) , or using a
Mendeola transaxle. Unfortunately, neither of the options are appropriate for our project at this time. The cheapest Mendeola, for example, has a starting price of $5K. That would eat the remainder of the project budget! The Porsche swap, while fiscially possible, requires a lot more metal fabrication type work ... work, that is out of our skill set at this time. Once the Blue Moon Dune project is completed, we should have the skills necessary to go back and do the Porsche swap. This leaves us with using a built up Type-I Swing Axle transaxle.
From reading lots and lots of message posts, the general consensus is that a decently built Type I transaxle can handle between 90 hp - 130 hp, depending on the driving style of the pilot. So, we will be using a built type I swing axle transmission from
Rancho Performance Transaxles.
First Impressions of the dune buggy
Holy Crap! Talk about fun .... once it came off the car carrier and started, I heard the musical "whaooop whaooop" sound matching the throttle pushes that a true dune buggy must make. After paying the car carrier company, I took off in my new toy. Hat turned backwards, I tore out of the parking lot with a huge grin. It felt and drove very much like a Triumph Spitfire. Quick, fast, responsive steering. Alas, as I had feared, the puny 1500 VW motor (1493 cc, 53 HP @ 4200, 78 ft-lb @ 2600) just wasn't up to the task. As I went up hills, with the engine wide open, I could hear the engine bog down and see the speed fall. We can't wait to install a higher HP engine. As we pushed the dune buggy toward the 70 MPH mark, our confidence in the car quickly eroded. I only made it to 60 MPH before deciding to abandon the speed run. The car just didn't feel safe plus the gearing isn't right for those speeds. With the change out of the gears and the beefing up of the car's suspension, the target cruising speed of 70 MPH should be easily, and safely, achieved. Once we were done driving it around to get a feel for it, Val commented on how many people she saw point and stare. In one case, a dad turned back to his children in his car, pointed at us, and the kids came out of their seats to look at the dune buggy. Project goal number 3 achieved. :)
0-60MPH in under 6.0 seconds
From Newton's second law, we have:
F = ma, where F = force, m = mass, and a = acceleration
With trivial algebra we can see the equation will help us with the project goal of making the car run 0 - 60 MPH in under 6.0 seconds:
a = F/m
So, acceleration is driven from the ratio of Force and mass. To have a particular acceleration, there is a certain ratio that must be met. I will refer to this ratio as the "A Ratio." It is understanding this ratio that explains why motorcycles have much better acceleration than cars: better power to weight ratio (weight isn't a force, but rather a combination of mass and gravity ... since the amount of gravity for all of us on the Earths surface is so nearly identical, it just factors out anyway and we are safe to ignore the distinction between weight and force).
What acceleration ratio ("A Ratio") should I strive for? Well, what I did was collect 0-60 times and power/weight ratios for a number of really cool cars. They are listed in the table that follows. From this, I derived the target acceleration ratio for my project.
It is interesting to note that there are a lot of car experts on the Internet that debate which value is more important, Horsepower or Torque. The funny thing is, they are related by an equation! Regardless, each has importance depending on the dialogue. To discern which I would use for my final "A Ratio", I looked at the table I built and observed which ratio was the better predictor of 0-60 time (AT = Acceleration Ratio with Torque, AH = Acceleration Ratio with Horsepower). The numbers don't lie. The better, but not perfect, predictor of 0-60MPH time is the horsepower rating. It should be noted that gearing, aero dynamics, etc. all play a part in 0-60 times, but the target ratio will give me a good rule of thumb for my car.
| Car | 0-60
(secs) | Torque
(lb ft) | HP
(bhp) | Weight
(lbs) | AT Ratio | AH Ratio |
| Aston Martin DB7 (00) | 5.3 | 400 | 420 | 3582 | 0.111 | 0.117 |
| Aston Martin V8s (00) | 4.4 | 600 | 600 | 4354 | 0.137 | 0.137 |
| Audi TT (00) | 6.0 | 206 | 225 | 3086 | 0.066 | 0.073 |
| BMW Z3 (00) | 8.3 | 140 | 150 | 2965 | 0.047 | 0.050 |
| BMW Z8 (00) | 4.5 | 369 | 394 | 3494 | 0.105 | 0.112 |
| Bugatti EB110 (94) | 4.5 | 451 | 553 | 3440 | 0.131 | 0.160 |
| Caterham Seven (98) | 5.5 | 128 | 150 | 1213 | 0.105 | 0.124 |
| Corvette (98) | 5.8 | 355 | 339 | 3240 | 0.109 | 0.104 |
| Viper GTS (99) | 5.4 | 454 | 378 | 3428 | 0.132 | 0.110 |
| Ferrari 355 (97) | 4.8 | 268 | 380 | 3130 | 0.085 | 0.121 |
| Ferrari F40 (92) | 3.9 | 425 | 478 | 2425 | 0.175 | 0.197 |
| Ferrari F50 (95) | 3.7 | 347 | 520 | 2712 | 0.128 | 0.191 |
| Honda NSX (98) | 5.2 | 224 | 290 | 2976 | 0.075 | 0.097 |
| Honda S2000 (00) | 5.5 | 153 | 240 | 2778 | 0.055 | 0.086 |
| Jaguar XJ220 (93) | 3.7 | 475 | 542 | 3197 | 0.148 | 0.170 |
| Jaguar XKR (99) | 5.2 | 387 | 370 | 3858 | 0.100 | 0.096 |
| Lambo Diablo (95) | 5.0 | 428 | 492 | 3638 | 0.117 | 0.135 |
| Lotus Elise (00) | 5.5 | 128 | 143 | 1698 | 0.075 | 0.084 |
| Lotus 340R (00) | 4.7 | 126 | 177 | 1488 | 0.084 | 0.119 |
| McLaren F1 (92) | 3.5 | 479 | 627 | 2491 | 0.192 | 0.251 |
| Mazda MX5 1.8s (99) | 7.9 | 119 | 140 | 2270 | 0.052 | 0.061 |
| Mazda RX7 (95) | 6.0 | 218 | 237 | 2866 | 0.076 | 0.082 |
| Mercedes SL600 (93) | 6.0 | 420 | 394 | 4321 | 0.097 | 0.091 |
| Morgan Aero 8 (00) | 4.8 | 322 | 286 | 2204 | 0.146 | 0.130 |
| Noble M10 | 6.0 | 162 | 168 | 2204 | 0.073 | 0.076 |
| Panoz Eperante (00) | 5.1 | 317 | 320 | 3200 | 0.099 | 0.100 |
| Porsche 911 Turbo (00) | 4.0 | 413 | 414 | 3395 | 0.121 | 0.122 |
| Shelby Series 1 (00) | 4.4 | 290 | 320 | 2650 | 0.109 | 0.120 |
| TVR Tuscan | 4.2 | 320 | 360 | 2337 | 0.137 | 0.154 |
| Ultima GTR | 3.5 | 528 | 534 | 2183 | 0.241 | 0.245 |
Observations:
1. In general, the AH Ratio is the better guide for 0-60 times. The deltas between ATs are higher than AHs for comparable 0-60 times.
Honda S2000: AT Ratio = 0.055, AH Ratio = 0.086, and 0-60 MPH = 5.5s
Lotus Elise: AT Ratio = 0.075, AH Ratio = 0.086, and 0-60 MPH = 5.5s
Honda NSX: AT Ratio = 0.055, AH Ratio = 0.097, and 0-60 MPH = 5.2s
Jaguar XKR: AT Ratio = 0.100, AH Ratio = 0.096, and 0-60 MPH = 5.2s
Ferrari 355: AT Ratio = 0.085, AH Ratio = 0.121, and 0-60 MPH = 4.8s
Morgan Aero 8: AT Ratio = 0.146, AH Ratio = 0.130, and 0-60 MPH = 4.8s
McLaren F1: AT Ratio = 0.192, AH Ratio = 0.251, and 0-60 MPH = 3.5s
Ultima GTR: AT Ratio = 0.241, AH Ratio = 0.245, and 0-60 MPH = 3.5s
2. All cars with an AH Ratio greater than 0.10 have 0-60 times less than my target.
Conclusions:
So, what is my target ratio? Based on the analysis of the information collected, I need to have an AH Ratio of 0.10 or better. Given that my project car has an estimated weight of 1400 lbs, this means I need to have a bhp rating of 140 bhp (F=0.10*1400).
Generated rule of thumb: A car with a bhp rating of at least 10% its weight will have a 0-60 MPH time of under 6 seconds
Target bhp = 140
Allison Dune Buggy
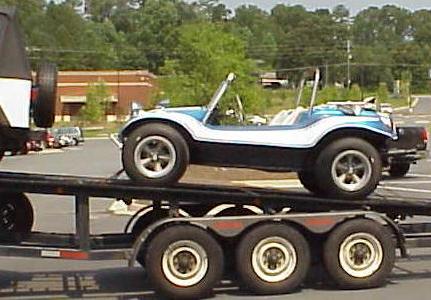
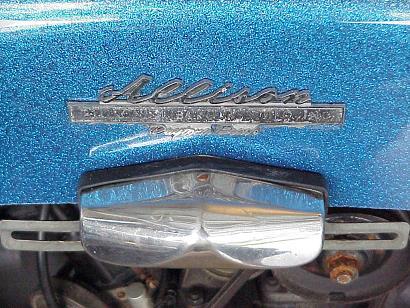
This dune buggy is an Allison Daytona Beach from Allison Fiberglass Manufacturing, Inc. The Allison dune buggy bodies are made of hand-laid, thick, fiberglass. They were maufactured in Port Orange, Florida during the early 70s. It is similar in style to the Meyers Manx, just much cooler. As the sales literature says, the Allison Daytona Beach is "The Cadillac of Dune Buggies." The blue fiberglass body sits on a 1965 VW Convertible pan.
Be Unique in Appearance
For a car to be cool, it has to be noticed. Sure, sleepers have their appeal (our 1994 RoadMaster, for example, is one hell of a sleeper with its LT1), but there is nothing like going somewhere and having people acknowledge your car. Maybe you get a thumbs up, or a wave, or a "cool car." Each time this happens, a feeling of pride for your ride sweeps through you. A cool, unique looking car also makes it more fun to go to such places as the beach, or the drive in, or a car rally, or a parade, or a race, or just anywhere. With all due respect to Mustang, Corvette, etc. owners, those cars are a dime a dozen and very rarely stand out. One reason we selected a dune buggy style car was for its uniqueness in our area.
Project Task List
Determine Car Type
Done!
Purchase Base Car
Done!
Identify Base Car Needs
Done!
Identify Power Needs
Done!
Identify Car Engine
Done!
Obtain Engine
Done!
Install Engine
Done!
Identify Transaxle Needs
Done!
Obtain Transaxle
Done!
Install Transaxle
Done!
Identify Suspension Needs
Done!
Obtain Suspension Parts
Done!
Install Suspension Parts
Done!
Identify Interior Needs
Done!
Obtain Interior Pieces
In Progress
Install Interior Pieces
To do


